Friday, September 2, 2011
Jenkins script for mass-update of email recipients
This is a handy Jenkins Groovy script that can be used to update all the mail recipients for your Maven projects. If you have a ton of projects, this can be way-faster than changing them each by hand. I'm putting this here for the Googling and my own notes.
import hudson.plugins.emailext.*
import hudson.model.*
import hudson.maven.*
import hudson.maven.reporters.*
import hudson.tasks.*
// For each project
for(item in Hudson.instance.items) {
println("JOB : "+item.name);
for( reporter in item.reporters) {
if(reporter instanceof MavenMailer) {
reporter.recipients = "new@email"
}
}
}
Sunday, January 23, 2011
Music of 2010
Melanie's post has inspired / shamed me into posting my own Music of 2010 review. I say shame because, well, I'll let the music do the talking:
- Kylie Minogue - Get Outta My Way - 9/3/2010 - 67 - 0.47
- P!nk - So What - 9/24/2010 - 52 - 0.43
- Superchunk - Learned to Surf - 9/24/2010 - 51 - 0.42
- Robyn - Hang With Me - 9/24/2010 - 47 - 0.39
- Drake, Kanye West, Lil Wayne & Eminem - Forever - 9/15/2010 - 47 - 0.36
- The Hold Steady - Hurricane J - 5/15/2010 - 93 - 0.37
- Yolanda Be Cool & Dcup - We No Speak Americano - 10/20/2010 - 28 - 0.29
- Lil Wayne - A Milli - 9/15/2010 - 38 - 0.29
- Taylor Swift - Love Story - 3/16/2010 - 98 - 0.31
- Macklemore - The Town - 8/24/2010 - 42 - 0.27
- The Lonely Forest - Live There - 8/20/2010 - 43 - 0.27
- Passion Pit - Little Secrets - 10/13/2010 - 25 - 0.24
- The Cinematic Orchestra - To Build a Home - 10/3/2010 - 27 - 0.24
- Aloe Blacc - Take Me Back - 9/3/2010 - 35 - 0.25
- Daft Punk - Da Funk - 8/24/2010 - 37 - 0.24
- Fitz & The Tantrums - Dear Mr. President - 8/24/2010 - 36 - 0.24
- Ke$ha - Blah Blah Blah (feat. 3OH!3) - 3/21/2010 - 77 - 0.25
- Balmorhea - Settler - 9/3/2010 - 32 - 0.23
- Ryan Adams - Come Pick Me Up - 8/26/2010 - 33 - 0.22
- James Brown - I Got the Feelin' - 9/2/2010 - 29 - 0.20
Because I'm a nerd, this is super complicated. Each entry includes the artist, song name, date added to my library (all 2010), total play count, and average number of plays per day. The songs are sorted by the average number of plays per day. I went this route because I thought raw play count gave too much weight to songs I had added earlier in the year. However, I'm not totally happy with this new system either, as I tend to listen to song A LOT when I first get them so they tend to be peaky and then taper off. Maybe if iTunes every kept an exact record of each song I played, I could go back and make things REALLY complicated, but until then.
Also, by not just going by raw play count, I avoided having to put Taylor Swift at the top of my list. However, it's not clear that Kylie Minogue or P!nk is much better. But who am I to deny my pop tendencies?
Thursday, September 23, 2010
Downhill Furniture Race and 30th Birthday Celebration
In a little more than a week, I'll be turning 30, which means I have precious few days of my 20s left to do stupid things and chalk it up to "emerging adulthood". What kind of stupid things, you ask?
Downhill Furniture Race and 30th Birthday Celebration
When: Saturday, Oct 2 - 2pm onward - Couches start rollin' at 4pm, sharp!
Where: Woodlawn Park - Shelters 4 or 5
What: Wheels + Furniture + Steep Hill
After party: Smokin' Petes BBQ in Ballard or UW Medical, as appropriate
Anyone who has known me long enough can tell you that I have a soft spot for putting wheels on things and racing them down hills. Basically, the following thought bubble pops into my head every few minutes:

We've got some furniture we want to get rid of and thus a dream is born.
For Racers:
Want to join the fun? We'll be setup starting at 2pm in one of the shelters on the map, working on our vehicles. I'll have a couch and chair, some wheels, some tools, and some crazy ideas. Feel free to join in. You'll be amazed what a few bucks will buy you at the Goodwill. If you do plan on racing, bring a helmet. Note that brakes and steering are encouraged when contemplating your design. Races officially start at 4pm, rain or shine!
For Observers:
Don't feel like death defying? Come watch the mayhem anyway. We'll be setup from 2pm onward working on the furniture. Feel free to come hang out. Refreshments and snacks will be provided. Races officially start at 4pm, rain or shine!
For the glory:
What's at stake here? How about the illustrious Winner's Cup!

Also, after the racing and assuming anyone is left alive, we'll be after-partying at Smokin' Pete's BBQ in Ballard and probably drinking away our troubles in some Ballard bar after that.
Planning on coming? Planning on racing? Drop me an email at bdferris@gmail.com to let me know.
Monday, February 1, 2010
Nerd: Trouble with Google Maps API, script tag, and jspx
I use jspx in a couple of places for OneBusAway, which is an XML-ified version of the venerable Java Server Pages (jsp) standard. I recently had a mysterious issue where I couldn't get a page to load properly that was referencing a <script> element for loading the Google Maps API. It turned out to be a problem with the way a jspx file is treated as an XML document. In my source file, I had something like this:
<script type=\"text/javascript\" src=\"…\"></script>
However, when that snippet is parsed as XML and spit back out again, it ends up looking like:
<script type=\"text/javascript\" src=\"…\"/>
That's a problem, because the Google Maps API does some script injection in the head of the html document on loading that seems to break if you use <script/> instead of <script></script>. Why? I don't really know. However, it was an issue on Firefox 3.5 that almost drove me insane.
Thankfully, there is a simple hack to fix the issue. Just insert a CDATA section in your own script tag and it won't be collapsed by the XML parser:
<script type=\"text/javascript\" src=\"…\"><![CDATA[<!-- -->]]></script>
Did the trick for me. I post it here so that Google might index it and help out somebody else out there some day.
Saturday, December 19, 2009
The Ferris 2009 Music Top 20
It's the end of the year, which means it time for christmas trees, overeating, and year-in-review lists. For my lists, I wanted to get an idea of what I was listening to in 2009. Unfortunately, though iTunes tracks playcounts, you can't break it down by year. Instead, I decided to look at the play counts for songs that I added in 2009 (though the song may have actually come out much earlier). Either way, it paints a pretty clear picture of what I listen to. Here's the top 20 artist + song + playcount.
1) Michele Williams - We Break the Dawn (Karmatronic Club Remix) [99]
2) DymeDef - Get Down [81]
3) Kate Havnevik - Timeless [66]
4) Passion Pit - Sleepyhead [65]
5) Cascada - Evacuate the Dancefloor [64]
6) Danger Mouse & Jemini - Ghetto Pop Life [62]
7) School of Seven Bells - Half Asleep [54]
8) Free Energy - Free Energy [51]
9) Phoenix - 1901 [50]
10) Basement Jaxx - Raindrops [49]
11) Madcon - Beggin' [46]
12) Michael Jackson - Scream [45]
13) Starfucker - Biggie Smalls [44]
14) The Unicorns - I Was Born (A Unicorn) [44]
15) KRS-One - Illegal Business [42]
16) Dirty Projectors - Stillness is the Move [40]
17) Fresh Espresso - The Lazerbeams [40]
18) Meiko - Reasons to Love You [39]
19) Q-Tip - Move [39]
20) Black Eyed Peas - I Gotta Feeling [37]
Trends: Dance music is my guilty pleasure. Michele Williams, Cascada, Basement Jaxx, Madcon, Black Eyed Peas and even a little MJ (rip). Toss in some hip-hop (DymeDef, Danger Mouse, KRS-One, Fresh Espresso, Q-Tip) and some indie-ish stuff (Passion Pit, School of Seven Bells, Free Energy, Phoenix, Starfucker, Dirty Projectors) along with everything else, and you are left with a rockin playlist. If you are a Brian Ferris that is (god help you).
Saturday, September 12, 2009
Urban Death March
Amy and I are celebrating our one-year wedding anniversary this weekend. Though we have a couple things planned for the weekend, we decided to go on a hike to Discovery Park in Seattle. I had never been and our goal of going there last week was complicated by cougar problems.
We left the apartment around 8am, swung by Cafe Besalu for some killer French pastries and then the hike was on. And boy did we hike:
View Urban Hike in a larger map
The main leg ended up being over nine miles! We hiked the full perimeter of Discovery Park and Magnolia Bluff. Once we got to Interbay, we cheated and caught a bus back to Ballard (because seriously, who hikes Interbay?) for a lunch at Smokin' Pete's BBQ (best brisket + ribs + sweet tea in Seattle, hands down). Add a little more mileage for the walk home, and bang: 10 miles. Crazy stuff.
Monday, September 7, 2009
Drawing the US is Hard
In this YouTube video (linked from BoingBoing), Senator (!) Al Franken free-hand draws a map of the United States with impressive attention to detail. I thought it'd be fun to try it myself. In fact, I encourage you to go give it a shot right now. Don't look at a map of the US before you start... you'll ruin all the fun.
Here is my result (click for a larger version):
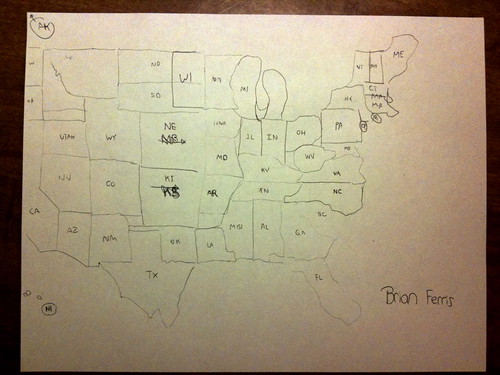
All in all, the results are pretty embarrassing, but not a complete failure. Let's look at some of the finer details:
1) Somehow Wisconsin ended up on the left-hand side of Minnesota.
2) Utah snuck up between Nevada and Idaho, when it belongs between Nevada and Colorado.
3) Whoops... where is New Jersey?
4) The NE is a general disaster.
How did yours turn out?
Here is my result (click for a larger version):
All in all, the results are pretty embarrassing, but not a complete failure. Let's look at some of the finer details:
1) Somehow Wisconsin ended up on the left-hand side of Minnesota.
2) Utah snuck up between Nevada and Idaho, when it belongs between Nevada and Colorado.
3) Whoops... where is New Jersey?
4) The NE is a general disaster.
How did yours turn out?
Subscribe to:
Posts (Atom)